Cheesy Garlic Rolls: An Amazing Ultimate Recipe
Cheesy Garlic Rolls are a delightful treat that combines the rich flavors of garlic and cheese in a soft, pillowy roll. These rolls are perfect for any occasion, from family dinners to parties or simply for a comforting snack. The explosion of flavors in each bite is nothing short of incredible, making them a favorite among cheese lovers and garlic enthusiasts alike. Whether served alongside pasta dishes or enjoyed on their own, these rolls promise to elevate your dining experience.
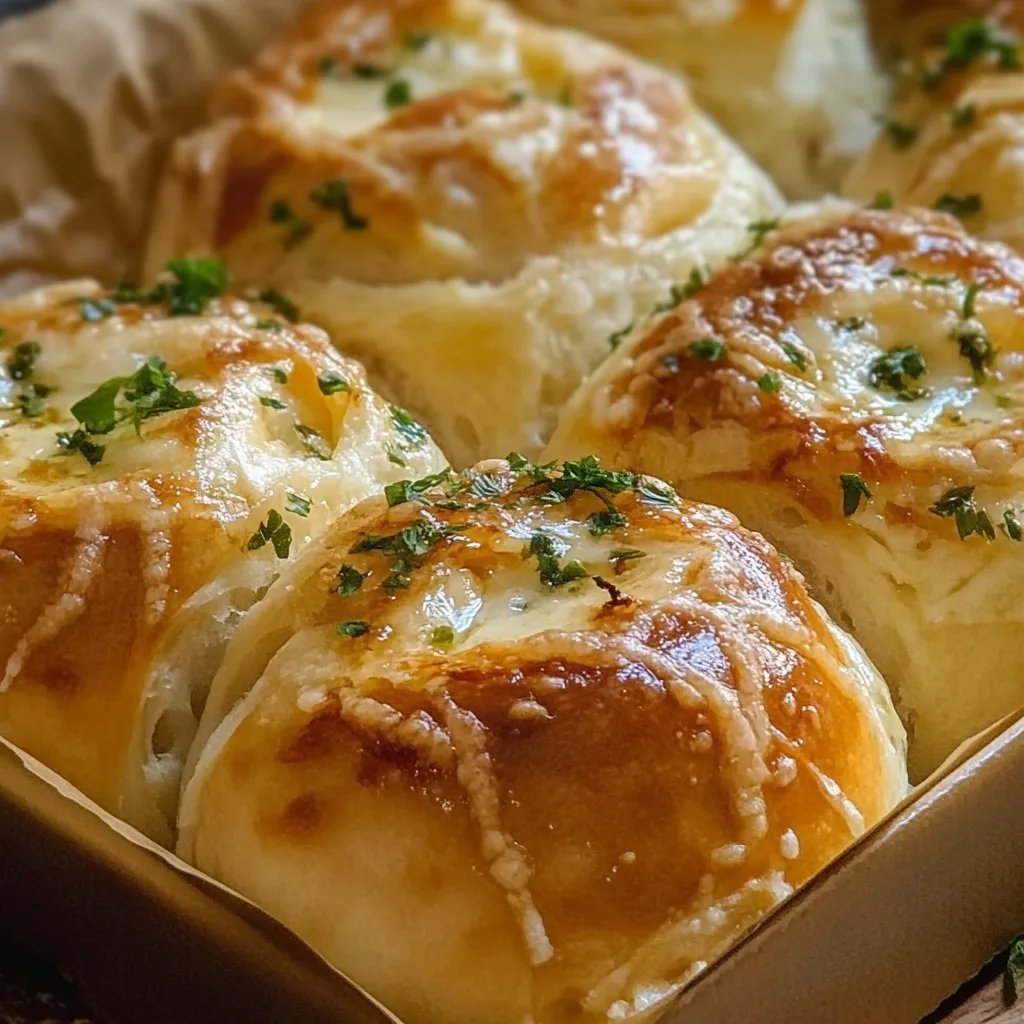
Imagine biting into a freshly baked roll, its golden crust giving way to a warm, gooey center filled with melted cheese. The irresistible aroma of garlic wafts through the air, tantalizing your senses and inviting you to indulge. With this amazing recipe for Cheesy Garlic Rolls, you’ll have the secret to creating a dish that everyone will rave about. Prepare to embark on a culinary adventure that will leave your friends and family asking for seconds (and thirds!).
This recipe is not only delicious but also relatively simple to prepare, making it accessible for everyone—regardless of your cooking expertise. With some basic ingredients and a little time, you can create these heavenly rolls that are bound to impress. In this guide, we will explore the reasons behind their popularity, provide you with preparation and cooking details, list the necessary ingredients, and walk you through the step-by-step instructions for perfect Cheesy Garlic Rolls. Let’s dive in!
Why You’ll Love This Recipe
Cheesy Garlic Rolls stand out for multiple reasons. Here are a few compelling points that explain why you will adore this recipe:
1. Irresistible Flavor Combination: The blend of garlic and cheese creates a mouth-watering experience that’s hard to resist.
2. Satisfying Texture: You will enjoy the contrast of a crispy exterior with a soft and gooey interior that welcomes melted cheese.
3. Easy to Make: With straightforward instructions, you don’t need to be a master chef to achieve fantastic results.
4. Perfect for Sharing: These rolls are ideal for gatherings, bringing friends and family together over a shared love of cheesy goodness.
5. Versatile Dish: Serve them as a side with your favorite meals or make them the star of your appetizer spread.
6. Make-Ahead Option: You can prepare the dough in advance, allowing you to bake them fresh when the time comes.
With all these reasons, it’s no wonder Cheesy Garlic Rolls have earned a special place in the hearts and stomachs of food lovers everywhere!
Preparation and Cooking Time
The total time to prepare and cook Cheesy Garlic Rolls is about 1 hour and 15 minutes, which includes both the rising and baking times. Here’s a breakdown for easier planning:
– Preparation Time: 30 minutes
– Rising Time: 30 minutes
– Baking Time: 15-20 minutes
These times offer a good guideline but may vary based on your specific kitchen setup and experience level.
Ingredients
– 2 cups all-purpose flour
– 1 cup shredded mozzarella cheese
– 4 tablespoons unsalted butter (melted)
– 1 tablespoon garlic powder
– 1 tablespoon sugar
– 1 teaspoon salt
– 2 teaspoons instant yeast
– 1/2 cup warm water
– 1 tablespoon chopped fresh parsley (optional)
– Extra butter for brushing (optional)
Step-by-Step Instructions
Creating the perfect Cheesy Garlic Rolls can be a breeze if you follow these simple steps:
1. Prepare Your Workspace: Begin by gathering your ingredients and ensuring your kitchen is clean and organized.
2. Activate Yeast: In a bowl, combine warm water, sugar, and instant yeast. Let it sit for about 5 minutes until frothy.
3. Combine Dry Ingredients: In a large mixing bowl, whisk together flour, garlic powder, and salt.
4. Mix Wet Ingredients: Add the melted butter and the yeast mixture to the dry ingredients, mixing until a dough forms.
5. Knead the Dough: Transfer the dough to a floured surface and knead for about 5 minutes until smooth and elastic.
6. First Rise: Place the dough in a greased bowl, cover it with a damp cloth, and let it rise in a warm spot for about 30 minutes or until doubled in size.
7. Prepare Filling: While the dough rises, mix the shredded mozzarella cheese with chopped parsley in a separate bowl.
8. Shape the Rolls: Once the dough has risen, punch it down and roll it out into a rectangle. Cut into square pieces (about 2 inches).
9. Fill with Cheese: Place a small spoonful of the cheese mixture in the center of each square. Fold the corners toward the center and pinch to seal.
10. Second Rise: Place the stuffed rolls seam-side down on a greased baking sheet. Cover and let rise for another 15-20 minutes.
11. Preheat Oven: While the rolls rise, preheat your oven to 375°F (190°C).
12. Bake the Rolls: Once the rolls have risen, brush the tops with butter (if desired) and bake for 15-20 minutes or until golden brown.
13. Cool and Serve: Allow the rolls to cool on a wire rack for a few minutes before serving.
How to Serve
Serving Cheesy Garlic Rolls can be just as delightful as making them. Here are some tips to ensure your rolls shine on any table:
1. Garnish: For an attractive presentation, sprinkle chopped parsley or grated Parmesan cheese on top before serving.
2. Dipping Sauce: Offer marinara or garlic butter as dipping options to elevate the flavor experience.
3. Warm Serving: Serve the rolls warm for the best taste and texture; they are best enjoyed fresh out of the oven.
4. Pair with Dishes: These rolls make an exceptional side dish for pasta, salads, or grilled meats, adding a deliciously cheesy touch to any meal.
With these serving suggestions, your Cheesy Garlic Rolls will be a hit at any gathering, ensuring that everyone leaves the table satisfied!
Additional Tips
– Adjust Garlic Flavor: If you prefer a milder taste, reduce the garlic powder or use fresh garlic instead.
– Experiment with Cheese: Feel free to mix cheeses like cheddar, parmesan, or even feta for a unique flavor experience.
– Butter Brushing: Brush the rolls with garlic-infused butter for an extra layer of flavor. Simply mix minced garlic with melted butter before brushing.
– Serve with Fresh Herbs: A sprinkle of fresh herbs like basil or oregano can enhance the aroma and taste.
– Use a Baking Stone: If you have a baking stone, preheat it in the oven. This helps achieve a perfectly crispy bottom for your rolls.
Recipe Variation
Mix things up with these variations for your Cheesy Garlic Rolls:
1. Stuffed Rolls: Add cooked spinach or sautéed mushrooms along with the cheese for a veggie-packed option.
2. Spicy Twist: Incorporate red pepper flakes or jalapeños into the cheese mixture for a spicy kick.
3. Cheesy Pesto Rolls: Replace some or all of the mozzarella with pesto and cheese for a delightful twist on flavor.
4. Sweet Garlic Rolls: For those who enjoy a sweeter touch, add a bit of honey or sugar to the dough for a sweet garlic roll experience.
Freezing and Storage
– Storage: Keep your Cheesy Garlic Rolls in an airtight container at room temperature for up to 2 days for optimal freshness.
– Freezing: To freeze, let them cool completely, then wrap them tightly in plastic wrap or aluminum foil. They can be stored in the freezer for up to 3 months. To reheat, simply place them in a preheated oven until warmed through.
Special Equipment
To make the most out of your baking experience, consider having the following tools on hand:
– Large mixing bowls for combining ingredients
– A rolling pin to flatten the dough
– A sharp knife or dough cutter for cutting the rolls
– Measuring cups and spoons for accuracy
– Baking sheets lined with parchment paper for easy cleanup
Frequently Asked Questions
Can I make these rolls gluten-free?
Yes, you can substitute all-purpose flour with a gluten-free flour blend. Just ensure the yeast is also gluten-free.
How can I tell when the rolls are done baking?
Look for a golden-brown color on top, and when tapped gently, they should sound hollow. You can also use a toothpick to check doneness.
What should I do if the dough doesn’t rise?
Ensure the yeast is fresh and the water used for activating it was not too hot or too cold. If the dough does not rise, it may be due to ineffective yeast.
How do I reheat leftover rolls?
Wrap them in aluminum foil and warm them in a 350°F oven until heated, or use a microwave for quick reheating, but be mindful not to overheat, which can make them chewy.
Can I serve these rolls with other dishes?
Absolutely! They pair wonderfully with soups, salads, and Italian dishes.
Conclusion
Cheesy Garlic Rolls are not just a dish; they are an experience that delights and warms the heart. Their combination of creamy cheese and aromatic garlic makes them a crowd favorite. Whether served warm as a side or enjoyed straight out of the oven as an appetizer, they are bound to be the highlight of any meal. Try this recipe, and you’ll have a guaranteed winner for any gathering!